Continuous Deployment with CircleCI 1.x and Capistrano for web applications
Saving time by automating routine deployment tasks
Why do we need automation?
Developers often save time on automation of the deployment process at the beginning of a project. Therefore, some of developers manually start the deployment. As the project becomes larger and the team grows, more features and fixes are released every day. Deployment takes a huge amount of precious time and distracts developers from working on important tasks like reviewing new versions or showing new features or fixes for clients.
Continuous Deployment
Continuous Delivery is a software development practice that allows for building software in such a way that the new update can be released any time.
CircleCI
The best practice is to automatically run the command for deployment after successful build passing. CircleCI makes it easy to configure your workflow and push the project to the deployment host. With CircleCI, each successful build of your code is automatically delivered to staging, production or any other stage you require to deliver your application. After the successful (or failed) build passing and deployment you receive an email notification.
Capistrano
Capistrano provides a DSL in Ruby for writing a configuration file with tasks to deploy. In this tutorial, I will not describe how to work with this tool because there are many different cases depending on the stack of application. However if you want to deploy a Rails application, check my previous article on how to do that.
Step by step configuration
You need an deployed application with written tasks for release delivery. I’ll show you the step by step configuration of continuous deployment of the application using a small API based on Rails as example.
Adding integration
Select CircleCI from the integrations list.

And authorize it with Github.

Move to Dashboard and start building a project.

After first running, the tests will probably be passed. But for automated deployment we need to specify a task.
Configuration file
Initialize an YAML file into the root directory of your project.
touch circle.ymlIn my case, I have two tasks to deploy on two different stages — staging and production.
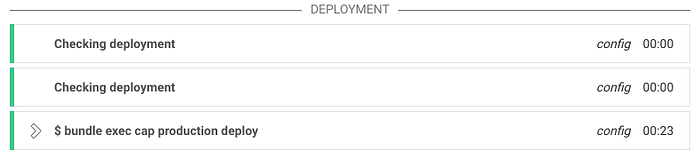
Now we can commit changes and push them to remote repository. When changes will be merged into staging or production, the branch commands specified in the circle.yml will be launched automatically after passing the tests.
Before creating staging/production branch we need to add an ssh key on the CircleCI project that enables us to connect to our node.
If you have an access to the node from your machine, just copy it:
cat ~/.ssh/id_rsaOpen project settings, select “SSH Permissions” tab and click on “Add SSH Key”.
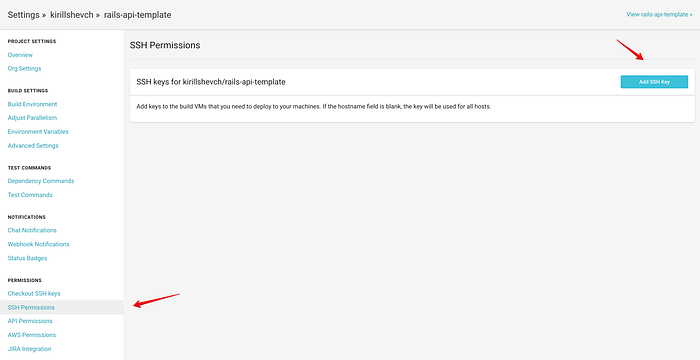
Into an opened popup put a сopied ssh private key.

The last step is to create branches from which you’ll deploy to different stages. In my case, it’s a command:
cap production deployDeliver last changes to production stage right after the creation of the branch and tests passing.